Location
The Rover SDK facilitates the use of location to trigger or personalize campaigns authored in the Rover Campaigns app.
Initialize Rover
To take advantage of Rover’s location features ensure the LocationAssembler is added when you initialize Rover. It does not take any arguments.
Rover.initialize(assemblers: [
    // ...
    LocationAssembler()
])
Prepare Your App
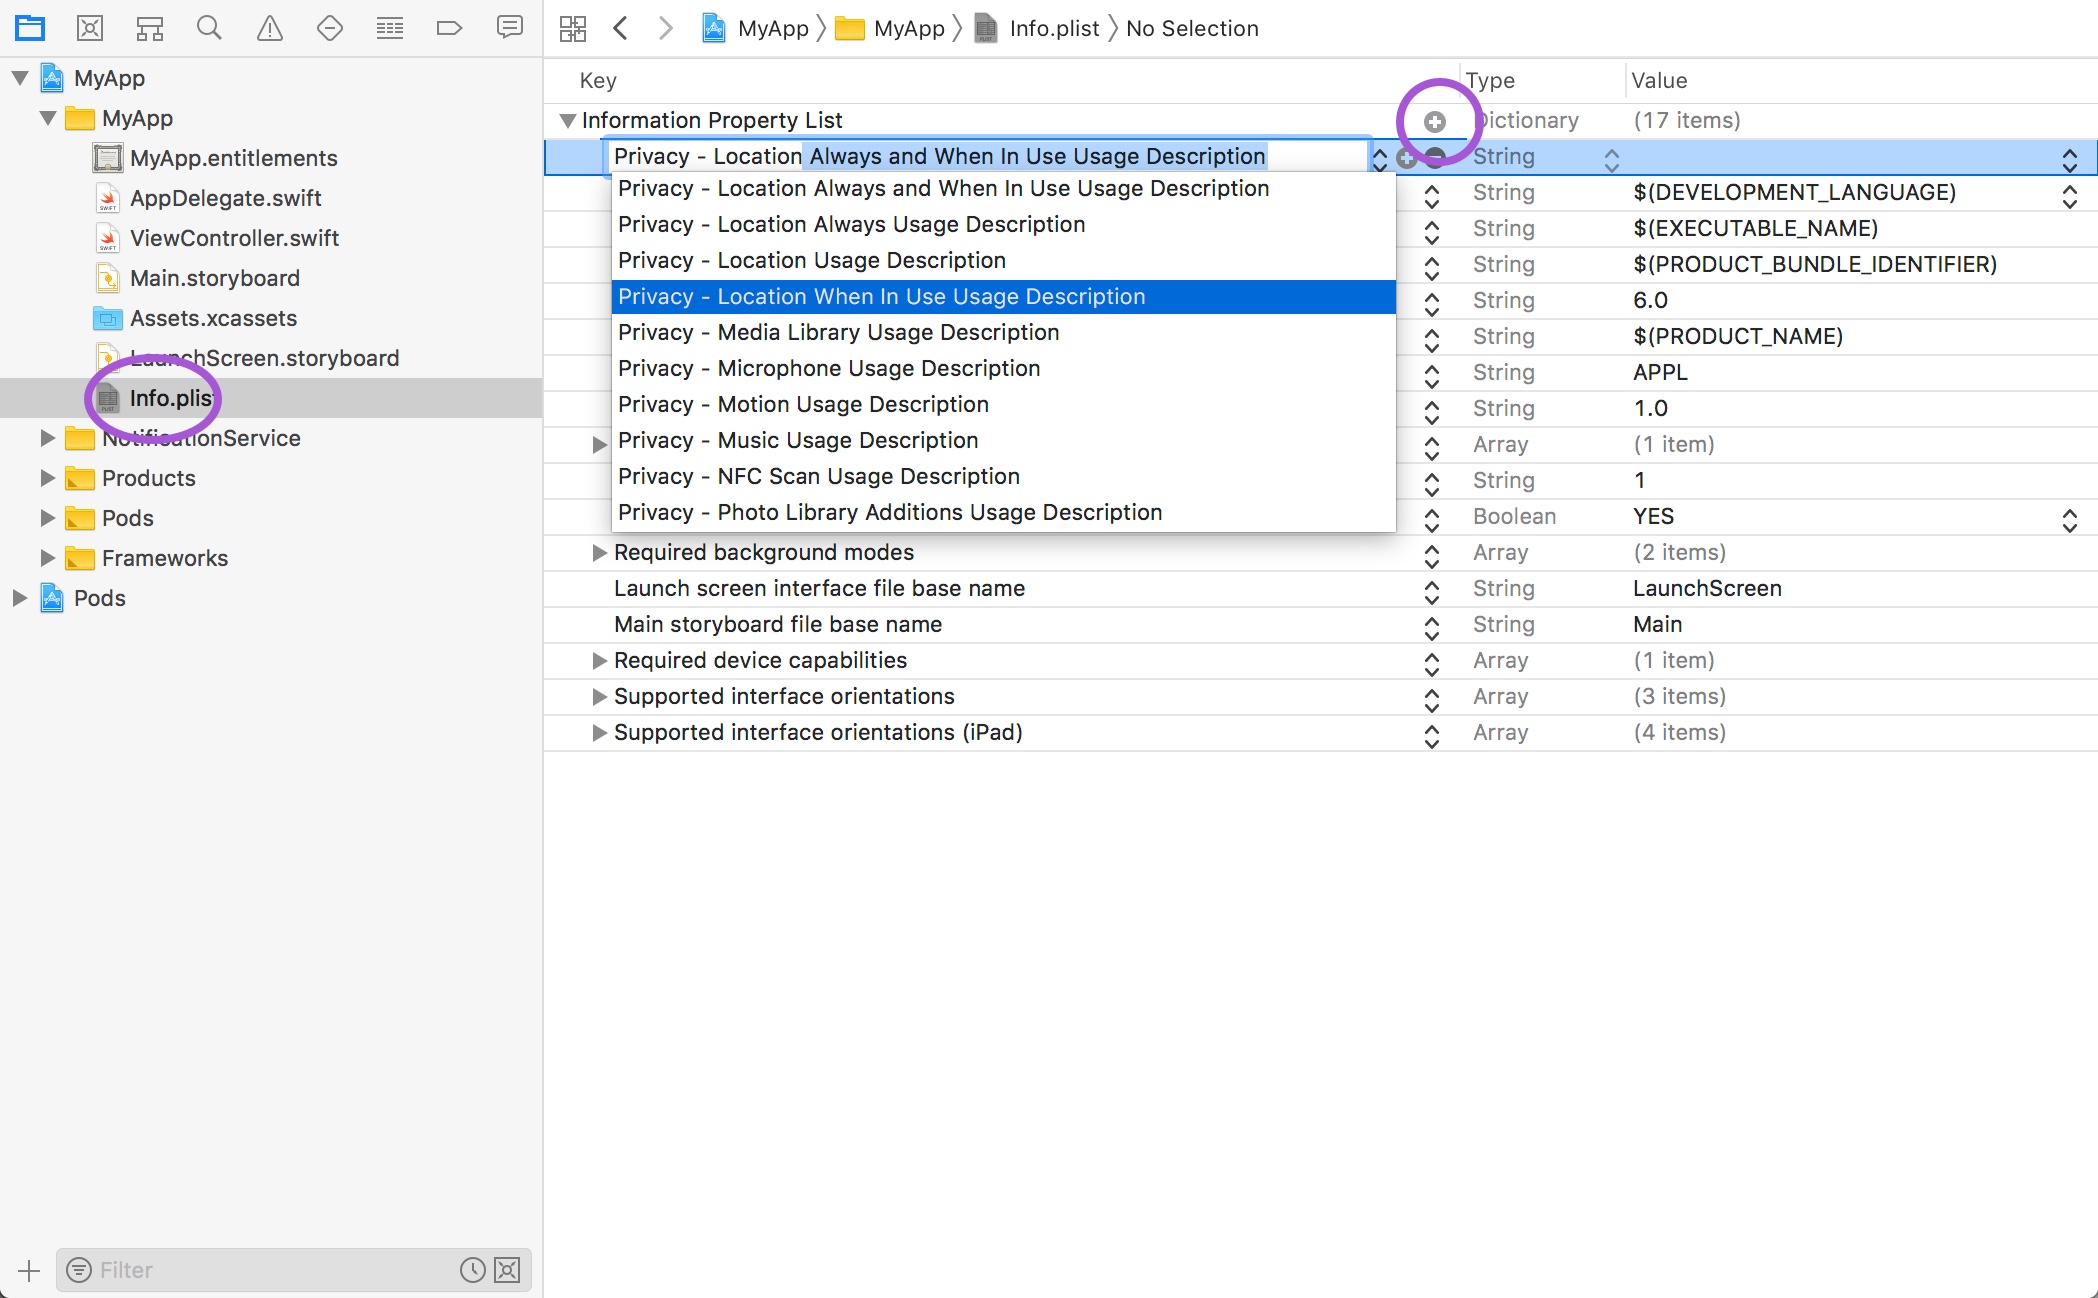
To use Rover’s location features you need to add three specific keys to your app’s info.plist file. If you do not set values for these keys iOS will not allow your app to access the user’s location and Rover’s location features will not work.
Select your app’s info.plist from the project navigator and click the plus (+) icon next to “Information Property List” to add a new property. Start typing “Privacy - Location”, arrow-key down to “Privacy - Location When In Use Usage Description” and press return when it is highlighted.
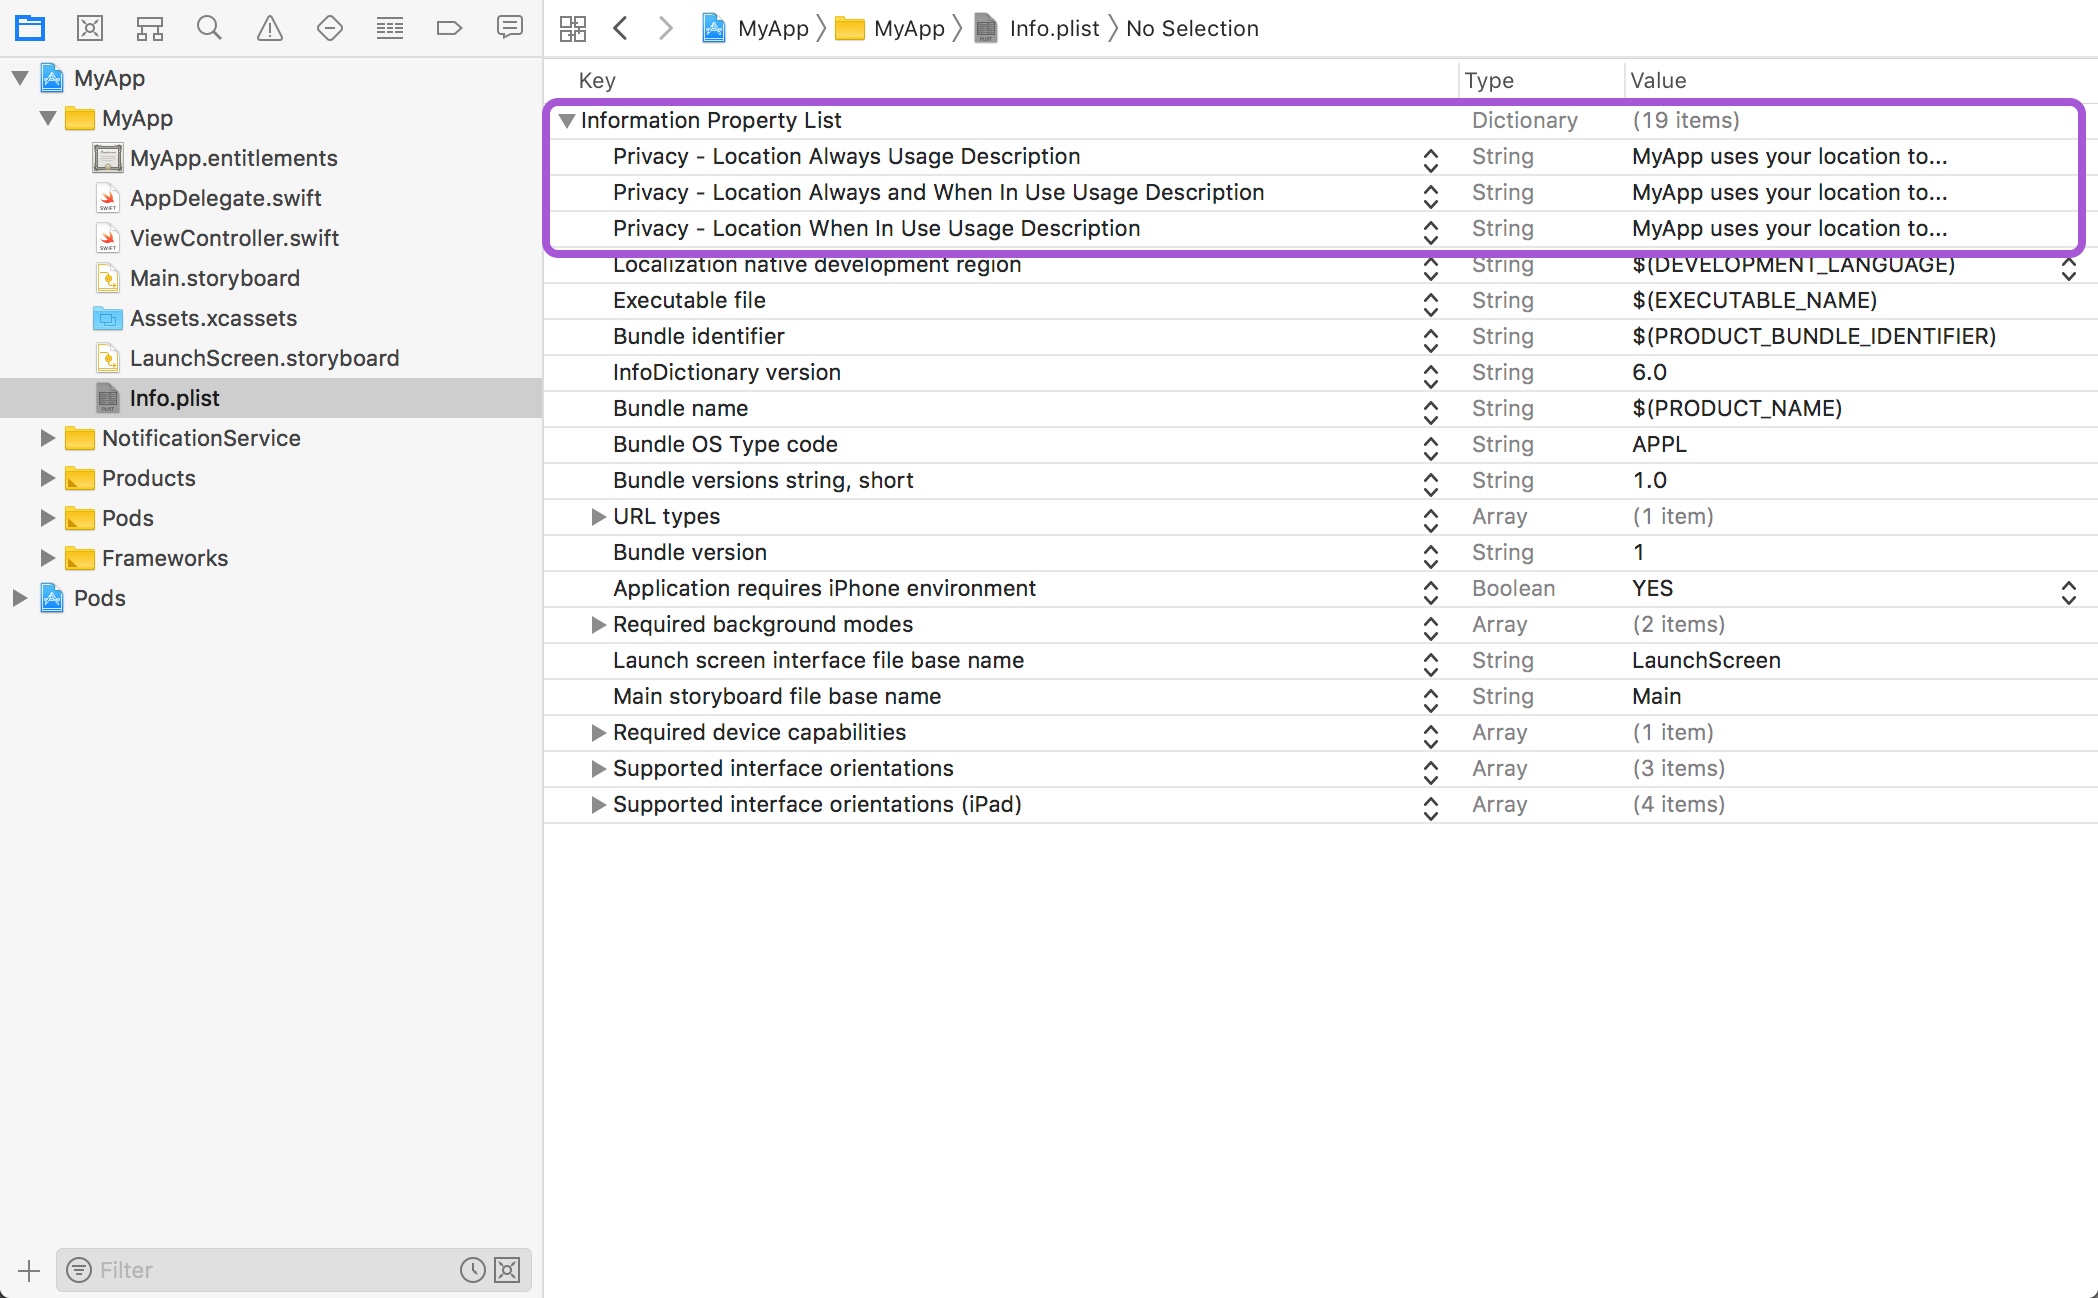
In the value column enter a message that explains to your users how your app can provide a better user experience if they grant access to their location. For example, “MyApp uses your location to…”.
Repeat this process for the “Privacy - Location Always and When In Use Usage Description” and the “Privacy - Location Always Usage Description” keys. You should now have a total of three location entries added to your info.plist file.
Requesting Authorization
Before your app can access the user’s location you need to ask permision. The permission prompt uses the keys setup in the previous step to customize the messaging presented to the user when authorization is requested. If you do not set a value for the proper keys, the prompt will not display and your app will not be able to access the user’s location.
Request Authorization at Launch Time
The simplest approach is to request authorization in your app delegate’s application(_:didFinishLaunchingWithOptions:) method. Add an instance of CLLocationManager to your app delegate.
import CoreLocation

@UIApplicationMain
class AppDelegate: UIResponder, UIApplicationDelegate {
    var locationManager = CLLocationManager()
    //...
}
In your app delegate’s application(_:didFinishLaunchingWithOptions:) method call the requestAlwaysAuthorization() method to display the permission prompt to the user.
func application(_ application: UIApplication, didFinishLaunchingWithOptions launchOptions: [UIApplication.LaunchOptionsKey: Any]?) -> Bool {
    //...
    locationManager.requestAlwaysAuthorization()
    return true
}
The first time your app makes this authorization request, the operating system will prompt the user for access to their location data. The user’s response is saved and subsequent requests will not prompt the user again. This simplifies your code as you do not have to check first to see if the user has already given permission before making this call. In other words, there is no negative consequence to calling this method every time your app launches.
Always vs When In Use
There are two methods on the CLLocationManager for requesting location access: requestAlwaysAuthorization() and requestWhenInUseAuthorization(). The former gives your app access to location data even when the app is in the background. The latter only gives your application access to location data while your app is in use. In order to track your user’s location and enable the use of beacons and geofences, your app must request “always” authorization.
Starting with iOS 11 Apple implemented a two-phased approach to requesting location access. Apple now recommends you start by requesting “when in use” authorization and some time later prompt your user to upgrade to “always” authoization. For simplicity, the above example is requesting always authorization directly. To lean more watch Apple’s recommended two-phase approach see the WWDC 2017 video What’s New in Location Technologies.
Deferring Authorization
As mentioned, the operating system saves the user’s response to an authorization request and subsequent requests will not prompt the user again. While this simplifies your code, it also means you only have one attempt at getting permission from your user.
A common pattern when launching an app for the first time is to go through an “onboarding experience” and many apps integrate the location authorization process into the onboarding. A best-practice has emerged where the user is presented with a screen explaining the benefits of authorizing location before the request has been made. This “pre-auth” screen usually explains to the user the benefits or authorizing location and presents the user with two buttons: “Yes” and “Maybe later”. The location authorization request is only made if the user taps the “Yes” button. If they tap “Maybe later” the onboarding process continues without requesting authorization, giving your app the opportunity to ask again at another time.
Region Manager
After your app has been authorized to access the user’s location data, you can subscribe to be notified when the user’s location changes through the CLLocationManager’s delegate. When the user’s location changes you can use Rover’s RegionManager to track a “Location Updated” event.
Extend your app delegate to conform to CLLocationManagerDelegate and implement the locationManager(_:didUpdateLocations:):
extension AppDelegate: CLLocationManagerDelegate {
    func locationManager(_ manager: CLLocationManager, didUpdateLocations locations: [CLLocation]) {
        Rover.shared?.resolve(RegionManager.self)?.updateLocation(manager: manager)
    }
}
In your app delegate’s application(_:didFinishLaunchingWithOptions:) method set your app delegate as the location manager’s delegate and start monitoring for significant location changes.
func application(_ application: UIApplication, didFinishLaunchingWithOptions launchOptions: [UIApplication.LaunchOptionsKey: Any]?) -> Bool {
    //...
    self.locationManager.delegate = self
    locationManager.startMonitoringSignificantLocationChanges()
}
Beacons and Geofences
The Rover Proximity app provides a browser interface to manage your beacons and geofences. The RoverLocation module uses the SyncCoordinator to fetch these objects from Rover’s servers and store a copy on disk. Through Rover’s sync mechanism the device is always kept up to date with the versions on the server so changes you make in the Proximity app will be propagated to your users.
The RoverLocation module uses the geofences and beacons fetched from the server to determine which ones to monitor for. You may have hundreds or thousands of geofences and beacons in your account but iOS can only monitor for 20 at a time. The Rover SDK handles the heavy lifting for you. Every time the user’s location changes the module will calculate the 20 geofences and beacons the user is most likely to encounter and starts monitoring for them.
This functionality is handled by the Rover RegionManager. In order for the RegionManager to function, it needs to know every time the user’s location changes or the device enters/exits a beacon or geofence region. Now that your app has been authorized to access the user’s location data, you can subscribe to be notified of location-related events through the CLLocationManager’s delegate.
Implement the following CLLocationManagerDelegate methods and call the appropriate methods on the Rover RegionManager.
extension AppDelegate: CLLocationManagerDelegate {
    func locationManager(_ manager: CLLocationManager, didEnterRegion region: CLRegion) {
        switch region {
        case let region as CLBeaconRegion:
            Rover.shared?.resolve(RegionManager.self)?.startRangingBeacons(in: region, manager: manager)
        case let region as CLCircularRegion:
            Rover.shared?.resolve(RegionManager.self)?.enterGeofence(region: region)
        default:
            break
        }
    }

    func locationManager(_ manager: CLLocationManager, didExitRegion region: CLRegion) {
        switch region {
        case let region as CLBeaconRegion:
            Rover.shared?.resolve(RegionManager.self)?.stopRangingBeacons(in: region, manager: manager)
        case let region as CLCircularRegion:
            Rover.shared?.resolve(RegionManager.self)?.exitGeofence(region: region)
        default:
            break
        }
    }

    func locationManager(_ manager: CLLocationManager, didRangeBeacons beacons: [CLBeacon], in region: CLBeaconRegion) {
        Rover.shared?.resolve(RegionManager.self)?.updateNearbyBeacons(beacons, in: region, manager: manager)
    }
}
Location Updates
Additionally, to send location updates to Rover in order to enable location-based segmentation in Audience, within your CLLocationManagerDelegate:
extension AppDelegate: CLLocationManagerDelegate {
    // ...
    func locationManager(_ manager: CLLocationManager, didUpdateLocations locations: [CLLocation]) {
        Rover.shared?.resolve(RegionManager.self)?.updateLocation(manager: manager)
    }
    // ...
}
Initial Location Update
Every time the RegionManager’s updateLocation(manager:) method is called the RegionManager will fetch the geofences and beacons from disk that were synced by the SyncCoordinator and start monitoring for the 20 the user is most likely to encounter. For this reason, it is a good idea to call the updateLocation(manager:) when your app performs its initial sync. If you correctly setup the SyncCoordinator as described in the Syncing Data guide, you should have a line that looks like this somewhere in your app delegate:
func application(_ application: UIApplication, didFinishLaunchingWithOptions launchOptions: [UIApplication.LaunchOptionsKey: Any]?) -> Bool {
    // ...
    Rover.shared?.resolve(SyncCoordinator.self)?.sync()
    // ...
}
Change the call to sync() to include a completion block and call the RegionManager’s updateLocation(manager:) method from within it:
func application(_ application: UIApplication, didFinishLaunchingWithOptions launchOptions: [UIApplication.LaunchOptionsKey: Any]?) -> Bool {
    // ...
    Rover.shared?.resolve(SyncCoordinator.self)?.sync {
        Rover.shared?.resolve(RegionManager.self)?.updateLocation(manager: self.locationManager)
    }
    // ...
}
Accessing the Current Beacons and Geofences
The RegionManager keeps track of the current beacons the user is nearby and the geofences the user is within. You can acccess these from the currentBeacons and currentGeofences properties.
let nearbyBeacons = Rover.shared?.resolve(RegionManager.self)?.currentBeacons
let enclosingGeofences = Rover.shared?.resolve(RegionManager.self)?.currentGeofences
You can also subscribe to be notified whenever these values change by adding observers to the beaconObservers and geofenceObservers properties.
class AppDelegate: UIResponder, UIApplicationDelegate {
    //...
    var beaconObserver: NSObjectProtocol?
    var geofenceObserver: NSObjectProtocol?

    func application(_ application: UIApplication, didFinishLaunchingWithOptions launchOptions: [UIApplication.LaunchOptionsKey: Any]?) -> Bool {
        //...
        self.geofenceObserver = Rover.shared?.resolve(RegionManager.self)?.geofenceObservers.add { geofences in
            print("Observed a change in geofences – currently within \(geofences.count) geofence(s)")
        }

        self.beaconObserver = Rover.shared?.resolve(RegionManager.self)?.beaconObservers.add { beacons in
            print("Observed a change in beacons - currently nearby \(beacons.count) beacon(s)")
        }
        //...
    }
}
Required Modules
- RoverFoundation
- RoverData
- RoverLocation